Saturday, April 16, 2011

Colored Ice


Kids love playing with ice. It's slippery, wet, messy, and in this case colorful - what's not to love? Not only is this a great sensory activity, but it's also a way to explore the states of matter. Materials are in boldface.

For this activity, you start out with regular, colorless ice cubes. Sprinkle some salt on the ice, then show kids how to carefully drop food coloring a drop at a time on the ice cubes. Watch as the salt, ice, and color work together to create different textures and color patterns. You can use any kind of salt or a combination of different types. The salt makes the colors appear really vibrant. You could also try this without the salt.

At the end, the kids can use the colored ice to paint pictures. Or just have fun watching it melt!

Questions & concepts:
Did the salt make the ice melt slower or faster?
What happens when colors are mixed together?
What are some ways to speed up or slow down the melting process?
Discuss how water can be a solid or a liquid.
Disucss the ways in which water changes state (freezing & melting).
Posted by Picasa

Tuesday, December 28, 2010

Recycling Bin Castle

I haven't posted in awhile - over a year - but I've been thinking I'd like to get back to the blog. I came upon these pictures while looking at the past year and thought this project would make a good post.

Nicholas is fascinated with fairy tales, princesses, knights, and castles. I thought it would be neat to make a castle out of recyclables, which we always have on hand (much to Brian's chagrin). Finally, one long winter afternoon, inspiration hit and I did a google search to get further ideas. The Family Fun website had some great ideas for a castle made of boxes. http://familyfun.go.com/crafts/the-great-cardboard-castle-668698/
Some of the ideas we copied directly and others we improvised. Once we got going, it really took very little time. We attached the parts with masking tape, and so far it's held up after almost a year of frequent use. Once it was put together N painted it grey with acrylic paint. Then I cut a small rectangle out of a sponge, and N and I went to town painting on darker grey bricks to make it look a little more realistic.

Some of my favorite features are the dixie cup and egg carton balconies, the toilet paper tube turrets, and the drawbridge. The drawbridge is definitely N's favorite feature. To make the drawbridge stand out, I twisted up newspaper into a snake and taped it around the opening. It gives the effect of stone.

Once we had a castle, dolls were needed. I bought a set of Melissa & Doug Royal Family Dolls before realizing I really could have just used Playmobil figures. Any small figures would work: Little People, Imaginext, even action figures. Later on I bought a dragon at Michael's and a small witch doll, which have added to the fun.

The castle has a permanent spot in an out-of-the-way spot in our living room, and it gets played with several times a week, if not daily.

Materials:
shoebox
pasta box
2 cans
2 metal tea cannisters
2 toilet paper tubes
herbal tea box
egg carton
1 sheet of newspaper
grey acrylic paint
black acrylic paint
masking tape
Posted by Picasa

Friday, October 23, 2009

Cotton Ball Ghosts


This project is so simple it hardly qualifies as a project, but it makes a really quick and cute Halloween decoration.

All you do is gently pull apart cotton balls or batting. You can tell who made which ghosts - mine are a full cotton ball that's just been stretched, while N tore his into little pieces. Whoever said ghosts should all be the same size? Let your little one glue on the eyes, and voila, you have a ghost!

I really like how they turn out so wispy and, well, ghost-like. I also like that no matter what the little ones do to the cotton, they still resemble ghosts.
Posted by Picasa

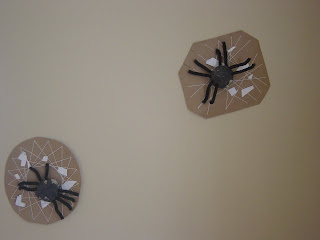
Spider in a Web Craft


This is really two projects in one; one of them is perfect for toddlers, the other is great for older kids.

To make the spiders, have kids paint the outside of the cups of an egg carton black. Once dry, cut the cups apart and punch 8 holes around the bottom. Cut pipe cleaners into short segments and bend into V shapes, then put 4 pairs of legs through the 8 holes. For an extra touch, glue on googly eyes. Spiders can have 2, 4, 6, or, most commonly, 8 eyes.

To make the webs, cut out a circle or rectangle from a cereal box. Cut notches all around the edges. Then take a long piece of white string and wind around, securing the string into the notches. Older kids might wind the string randomly, or come up with a pattern.

Hook one leg around a piece of the string and your spiderweb is ready for some insects to fly by! (The little pieces of white paper are baby spiders that N cut out and wanted to add to the web.)
Posted by Picasa

Thursday, October 22, 2009

Skeleton Scavenger Hunt

I'm hosting a Halloween party for a variety of ages, and I chose this activity for the grade-schoolers. I originally saw the idea in Family Fun magazine and then expanded on the idea a little bit. To create this scavenger hunt, you will need to print out a skeleton. One template can be found at this Halloween crafts website; another can be found at the Family Fun site.

Following are the clues to the locations of the bones. Once all the skeleton bones have been found, the kids will tape them up to the posterboard, where I've outlined the skeleton in chalk. Coming up with the clues is always the hardest part!

Clue 1:
For the location of this bone, go up the stairs
This is the spot where we wash our hair. (bathtub)

Clue 2:
Next you will proceed down the hall;
Look behind something that's a sign of the fall. (pumpkin decoration)

Clue 3:
We watch this box with its lights and sound;
You might find a clue if you just look around. (on top of TV)

Clue 4:
This is the room where we go to dine -
Crawling on the floor will be just fine. (underneath dining room table)

Clue 5:
In this place where N goes to doze,
You will find the skeleton's toes. (underneath pillow on N's bed)

Clue 6:
In the room with the big white sink
A bone is hiding under a drink. (underneath lemonade container in kitchen)

Clue 7:
These bones come in pairs
You'll find them as you climb down the stairs. (basement stairs windowsill)

Sunday, October 11, 2009

Party Favor Bags - Two Variations


For N's recent third birthday, we had two parties: a kids party and a family-and-neighbors party. This meant two sets of favor bags for the Outer Space theme.
These alien favor bags were made using templates designed for making paper bag puppets. I just flipped the bag right-side-up and left the opening intact.


These Outer Space favor bags show one scene when they're put side-by-side. I taped all the bags together along the back using painter's tape, then flipped them over and drew a scene along the front. This idea could be used for any party theme. Originally I was going to paint the bags, but due to time constraints I used colored chalk dipped in water instead. Dipping the chalk in water makes the color extra vibrant.


If you pick up little things you see here and there that are on sale, you can put together great favor bags that don't cost too much. Here's what I put in the favor bags:
*outer space flashcards from the dollar section at Target
*crayons from the back-to-school sales
*homemade, personalized coloring book (see below for directions)
*twirly straws
*parachute guy
*mini foam rocket shooter
*pop rocks

To make the coloring book, I Googled outer space, robot, and alien coloring pages. Then I copied and pasted the images into Publisher, four per page. I made double-sided copies, changed the name on the cover for each child, and cut and bound the pages. Ideally I would have just stapled them, but we only have a small stapler that doesn't open, so I had to punch three holes along the spine and bind them with string. These were actually really simple to put together and cost very little to make.


Posted by Picasa

Sunday, August 23, 2009

Gadget Painting


Painting is a very calm activity that will keep little ones occupied and engaged. This is a fun variation that allows kids to experiment and explore a little bit with items they may not normally come into contact with. N and his friend T were happily - and quietly - engaged for a good chunk of time while they worked on their painting; it's a nice and calming activity, even on a busy playdate. I got this idea from the show A Place of Our Own.

I recommend doing this activity on the kitchen floor or outside to make clean-up a bit easier.

Materials
paper - large butcher paper is fun, but any kind will work
4 paint pans (paper plates, recycled meat-type trays, pans, etc.)
paint
variety of kitchen utensils

Activity
Put the paper on the ground along with the paint trays. Either spread out the gadgets or place them in baskets. Do a quick demo of how to use the objects to make prints or paint, then allow let the kids have at it.
Posted by Picasa

Sunday, July 12, 2009

Teacher Store Finds Part I: Geoboards


Teacher stores are a terrific place to find inexpensive, fun, educational activities. One of my favorites is Geoboards. They are plastic boards with pegs in rows or a circle, and kids use rubber bands to make shapes and designs. This activity will keep a child age 3 or up occupied for a good chunk of time; N at 2 1/2 enjoys playing with them as well, but doesn't stay engaged for quite as long.
For little ones like two-year-old N or 3-year-old G, I just put out the rubber bands and let them go to town. Just like with drawing, they randomly put down designs and then describe what they made.
Older kids like four-year-olds and up can be given challenges of making specific shapes or certain numbers of things (3 squares, 2 triangles, etc.). Or give challenges like, "Make a rocket." "Make a picture using a rectangle, square, and triangle."
.
At the end, talk about what you see. Have even the youngest of children identify shapes they see, and point out shapes they might not know. Count the shapes. Talk about the colors. Make new shapes to teach your kids: parallelogram, trapezoid, etc. The possibilities are really endless with this!
If you don't live near a teacher supply store, you can order these at classroomdirect.com. A double-sided geoboard with rows on one side and a circle on the other costs $2.19.
What is your child gaining from this activity?
  • shape recognition
  • color recognition
  • geometry concepts
  • relationships between shapes
  • spatial awareness
  • concentration skills
  • vocabulary
  • communication
Posted by Picasa

Friday, June 26, 2009

Color Mixing + Car Painting


Color mixing is a fun way to learn about primary and secondary colors. Just squirt two primary colors (red, blue, yellow) onto a paper plate. Kids can mix the colors together using their fingers, a brush, a sponge - anything.


Slowly we're seeing some green on the paper! What better way to learn that yellow + blue = green?


No activity happens without N begging to use cars, so we took it a step further and made a car painting. N drove his cars and trains through the newly-mixed green paint, then drove them across paper to make tracks. He had fun experimenting with different cars and trains and seeing the fun designs they made. If you're looking for a quick, simple art project, give this one a try!
Posted by Picasa

Sunday, June 7, 2009

Goodbye, Wondertime Magazine

I began subscribing to Wondertime Magazine when I was pregnant. It blew me away from the start: Here was a magazine geared towards intelligent adults who happened to have children. The articles were long and well-written, examining topics from world travel to preschool humor in a thought-out, intelligent manner. Articles about getting kids to eat broccoli were hilarious, and the product recommendations were for toys that were out-of the ordinary, promoting creativity or enchantment or learning that isn't shoved down a child's throat.

Unfortunately, Wondertime didn't make it; this spring, publication ceased. This magazine was a Disney production, though completely un-Disnified, and archives can still be found on the website of their sister publication, Family Fun. I hope you'll check out their archives - you might just find an inpsiring idea or two.


Here are a few articles worth looking at:


Look Sharp: A Sharpie Chromatography T-Shirt Project