Friday, October 23, 2009
Cotton Ball Ghosts
This project is so simple it hardly qualifies as a project, but it makes a really quick and cute Halloween decoration.
All you do is gently pull apart cotton balls or batting. You can tell who made which ghosts - mine are a full cotton ball that's just been stretched, while N tore his into little pieces. Whoever said ghosts should all be the same size? Let your little one glue on the eyes, and voila, you have a ghost!
I really like how they turn out so wispy and, well, ghost-like. I also like that no matter what the little ones do to the cotton, they still resemble ghosts.
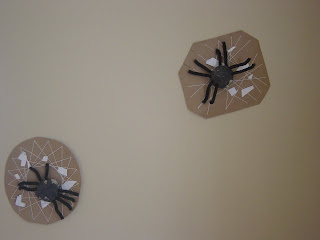
Spider in a Web Craft
This is really two projects in one; one of them is perfect for toddlers, the other is great for older kids.
To make the spiders, have kids paint the outside of the cups of an egg carton black. Once dry, cut the cups apart and punch 8 holes around the bottom. Cut pipe cleaners into short segments and bend into V shapes, then put 4 pairs of legs through the 8 holes. For an extra touch, glue on googly eyes. Spiders can have 2, 4, 6, or, most commonly, 8 eyes.
To make the webs, cut out a circle or rectangle from a cereal box. Cut notches all around the edges. Then take a long piece of white string and wind around, securing the string into the notches. Older kids might wind the string randomly, or come up with a pattern.
Hook one leg around a piece of the string and your spiderweb is ready for some insects to fly by! (The little pieces of white paper are baby spiders that N cut out and wanted to add to the web.)
Thursday, October 22, 2009
Skeleton Scavenger Hunt
I'm hosting a Halloween party for a variety of ages, and I chose this activity for the grade-schoolers. I originally saw the idea in Family Fun magazine and then expanded on the idea a little bit. To create this scavenger hunt, you will need to print out a skeleton. One template can be found at this Halloween crafts website; another can be found at the Family Fun site.
Following are the clues to the locations of the bones. Once all the skeleton bones have been found, the kids will tape them up to the posterboard, where I've outlined the skeleton in chalk. Coming up with the clues is always the hardest part!
Clue 1:
For the location of this bone, go up the stairs
This is the spot where we wash our hair. (bathtub)
Clue 2:
Next you will proceed down the hall;
Look behind something that's a sign of the fall. (pumpkin decoration)
Clue 3:
We watch this box with its lights and sound;
You might find a clue if you just look around. (on top of TV)
Clue 4:
This is the room where we go to dine -
Crawling on the floor will be just fine. (underneath dining room table)
Clue 5:
In this place where N goes to doze,
In this place where N goes to doze,
You will find the skeleton's toes. (underneath pillow on N's bed)
Clue 6:
In the room with the big white sink
A bone is hiding under a drink. (underneath lemonade container in kitchen)
Clue 7:
These bones come in pairs
You'll find them as you climb down the stairs. (basement stairs windowsill)
Sunday, October 11, 2009
Party Favor Bags - Two Variations
For N's recent third birthday, we had two parties: a kids party and a family-and-neighbors party. This meant two sets of favor bags for the Outer Space theme.

These alien favor bags were made using templates designed for making paper bag puppets. I just flipped the bag right-side-up and left the opening intact.
These Outer Space favor bags show one scene when they're put side-by-side. I taped all the bags together along the back using painter's tape, then flipped them over and drew a scene along the front. This idea could be used for any party theme. Originally I was going to paint the bags, but due to time constraints I used colored chalk dipped in water instead. Dipping the chalk in water makes the color extra vibrant.

If you pick up little things you see here and there that are on sale, you can put together great favor bags that don't cost too much. Here's what I put in the favor bags:
*outer space flashcards from the dollar section at Target
*crayons from the back-to-school sales
*homemade, personalized coloring book (see below for directions)
*twirly straws
*parachute guy
*mini foam rocket shooter
*pop rocks
To make the coloring book, I Googled outer space, robot, and alien coloring pages. Then I copied and pasted the images into Publisher, four per page. I made double-sided copies, changed the name on the cover for each child, and cut and bound the pages. Ideally I would have just stapled them, but we only have a small stapler that doesn't open, so I had to punch three holes along the spine and bind them with string. These were actually really simple to put together and cost very little to make.
Subscribe to:
Posts (Atom)


